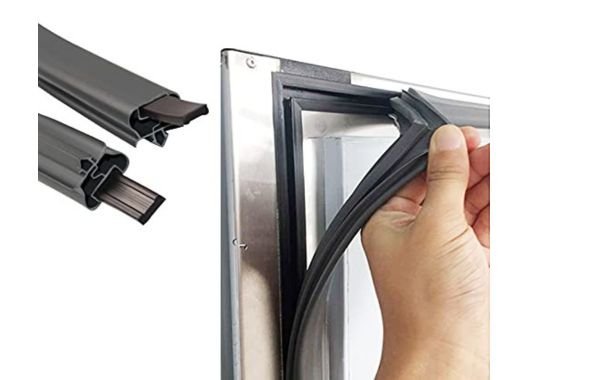
The best method for most people is to clean and re-set the gasket first — a dirty or twisted seal often feels weak when the magnet is fine. If the seal is torn, cracked or hardened, replacement wins instead. The three ways to remagnetize a freezer door seal below cover both paths.
Freezer door seal methods compared

Start with the cheapest option, because the magnet inside a freezer gasket rarely dies. What usually fails is the seal’s grip on the frame — dirt, a bend, or a gasket that’s gone stiff with age.
| Method | How long | Effort | Cost | Best for |
|---|---|---|---|---|
| Clean and re-set | 15–20 min | Low | Low | A seal that’s dirty or slightly twisted |
| Realign with heat | 20–30 min | Medium | Low | Dents, kinks and a warped gasket |
| Replace the gasket | 30–60 min | Medium | Medium | Cracks, tears and hardened rubber |
| Add a magnetic strip | 20–40 min | Medium | Low | A quick fix on an old seal |
Cleaning and re-setting costs nothing and fixes most weak seals. Heat realignment rescues a gasket that’s bent but still soft. Replacement is the only real cure once the rubber has hardened or split. A stick-on magnetic strip is the fourth option — it works for a while, but it’s rarely worth the trouble on a seal you’ll replace soon anyway.
Check your freezer’s own manual for the gasket part number before you buy anything. Prices vary by brand and model, so the maker’s site is the place to confirm the exact figure.
Clean and re-set the seal
This is the first thing to try, and it costs nothing. Grease, crumbs and sticky residue sit between the gasket and the frame, and they stop the magnet from pulling flat. Warm water and a little dish soap break that layer down.
- Unplug the freezer, or turn the thermostat to off.
- Mix a few drops of dish soap in a bowl of warm water — about 1 quart.
- Wipe the gasket and the frame with a soft cloth. Get into the fold of the seal.
- Rinse with a clean damp cloth, then dry both surfaces fully.
- Run your thumb along the gasket, pressing it back into its groove if it’s popped out.
Once it’s clean and seated, close the door and try the dollar-bill test. Close the door on a bill so half hangs out, then pull. If it slides out with no drag, the seal still isn’t gripping — move to the next method.
What it’s good at: it’s free, fast, and safe for any freezer. It also fixes the common case where the seal only looks weak. Its weakness is real — cleaning won’t help a gasket that’s cracked or gone hard, and you’ll know within a day if the door still springs open.
Realign a bent gasket with heat

A gasket that’s dented or twisted can be coaxed back into shape. Warm air makes the rubber soft enough to bend, and it holds the new shape as it cools. Don’t use a heat gun or a hairdryer on high — you’ll melt the seal.
- Unplug the freezer and open the door.
- Soak a towel in hot tap water — around 120°F to 140°F — and wring it out.
- Lay the towel over the bent section for 5 to 10 minutes.
- Gently pull the gasket straight while it’s warm, then hold it in place.
- Close the door and let it cool for 10 minutes before you check the fit.
Repeat once if the kink is stubborn. Two rounds is usually enough for a mild bend.
This method is good at saving a gasket that’s otherwise soft and intact — you avoid buying a part. Its honest weakness is that heat can’t restore rubber that’s already hardened with age, and too much heat will warp the seal for good. If the gasket feels stiff and brittle, skip this and replace it.
Replace the freezer door gasket
When the rubber has cracked, torn or gone hard, replacement is the only fix that lasts. A new gasket brings a fresh magnet and a soft seal. Order the part by your freezer’s model number, not by sight — gaskets look alike but fit differently.
- Unplug the freezer and pull the old gasket out of its channel, starting at a corner.
- Clean the channel and the door frame with warm soapy water, then dry.
- Soak the new gasket in warm water for 5 to 10 minutes so it’s flexible.
- Press it into the channel, working from the top corners down, and seat it fully.
- Close the door and check the seal. Run the dollar-bill test at four points.
If the door still won’t seal, the hinge or the door itself may be the problem — that’s a job for a technician, not a gasket swap. Check your manual for the correct part number and the maker’s fitting instructions.
This method wins on results: a new gasket seals like the day the freezer was made. Its downside is the cost of the part and the time to fit it. Some models glue the gasket rather than clip it, which makes the job messier.
Which freezer seal fix fits your situation?
When you’re in a hurry: clean and re-set the seal. It takes about 15 minutes, needs nothing you don’t already have, and it fixes the most common cause of a weak seal. If the door still won’t hold, you’ve lost almost nothing.
When you’re doing this for the first time: start with the cleaning method too, then try the heat realignment if a section of the gasket is bent. Both are low-risk, and together they cover most seals that aren’t physically damaged. Read the gasket carefully before you buy a part.
When you want the best possible result whatever it takes: replace the gasket. A new seal restores full magnetic pull and a tight fit, and it’s the only option that fixes cracked or hardened rubber. The trade-off is simple — the cheap fixes cost you time and may not last, while replacement costs more and lasts for years.
The trade-off runs the same way in every case: spend time first, or spend money once. Cleaning and heat are cheap and reversible. Replacement is a commitment, but it ends the problem.
One test settles which one you’re in. Close the door on a dollar bill at several points around the frame and pull. If it slides out easily at every point, the seal is weak all the way around and cleaning is worth your 15 minutes. If it grips everywhere except one corner or one stretch along the hinge side, that section is bent, and the heat method is the one to use.
If the bill pulls free with no resistance at all, or the rubber feels stiff and shows cracks when you bend it, no amount of cleaning will bring it back. Skip straight to replacement.
The mistake people make here is buying a gasket before testing the old one. A gasket that fits your model can still be the wrong part if the door itself is out of alignment, and then the new seal leaks exactly like the old one did.
What matters whichever method you pick
The seal is only as good as the surface it meets. Whatever you choose, the gasket has to sit flat against a clean, straight frame. A bent door or a worn hinge will defeat a brand-new seal, so check the door swing before you blame the magnet.
Test the seal the same way every time. The dollar-bill test — close the door on a bill and pull — tells you if the gasket is gripping. Do it at the top, bottom and both sides. If the bill slides out easily at one spot, that’s where the problem is.
The standard for a good seal is simple: the door should hold a light pull and close on its own from a few inches open. The U.S. Department of Energy publishes guidance on refrigerator and freezer efficiency, and a leaking door wastes energy — you can read the DOE guidance on refrigerator efficiency to see how door seals affect running costs.
At the end, plug the freezer back in and let it run for a few hours. Check that frost forms evenly and the door stays shut. If it still won’t seal after all three methods, the hinge or the door frame needs a technician — don’t force it.
Frequently asked questions
Can you actually remagnetize a freezer door seal?
No — the magnet inside the gasket doesn’t lose its power in normal use. What fails is the seal’s grip: dirt, a bend or hardened rubber stops the magnet from pulling flat. Cleaning, realigning or replacing the gasket restores the seal. The magnet itself almost never needs recharging.
Why is my freezer door seal not sticking?
The gasket is usually dirty, twisted or stiff. Grease and crumbs sit between the seal and the frame and break the magnetic contact. A bend in the rubber lifts part of the seal away. If the rubber feels hard or cracked, it’s worn out and needs replacing.
How long does it take to fix a weak freezer seal?
About 15 to 20 minutes for cleaning, 20 to 30 minutes for heat realignment, and 30 to 60 minutes to fit a new gasket. These times assume a standard home freezer with a clip-in gasket. A glued gasket takes longer, and a door that needs realigning is a separate job.
Is it safe to heat the freezer gasket?
Yes, if you keep the heat low. Hot tap water at around 120°F to 140°F is safe for the rubber. Never use a heat gun, a lighter or a hairdryer on high — those melt or warp the seal and leave you buying a new one anyway.
What happens if I ignore a bad freezer seal?
The freezer runs longer to hold temperature, frost builds up, and food may not stay frozen properly. A leaking door also lets warm, moist air in, which speeds up ice buildup. Fixing the seal early saves energy and protects your food.
How often should a freezer gasket be replaced?
Most gaskets last a long time, but the exact life depends on your model and how often the door opens. Check the seal periodically with the dollar-bill test, and follow the owner’s manual for guidance. Replace it when the rubber feels hard, shows cracks, or won’t grip after cleaning.
Can I use a magnetic strip instead of a new gasket?
You can, and it’s a quick fix for an old seal. A stick-on magnetic strip adds pull where the original magnet is weak. It’s a short-term patch, though — the strip can peel off, and it doesn’t fix cracked or hardened rubber. Replacement is the better long-term answer.
Conclusion
A weak freezer seal is usually a cleaning problem, not a magnet problem. Try the free fix first, move to heat if the gasket is bent, and replace it when the rubber has had enough. Whichever way you go, a clean frame and a quick dollar-bill test will tell you if the door is holding.